
.png?width=500&height=268&name=TRAZER%20Teachable%20Course%20Cover%20(1).png "TRAZER+ 101")
What is TRAZER?
TRAZER technology combines immersive simulation, motion capture analytics, and reaction-based challenges to help every body move better.
Designed for physical rehabilitation, strengthening, and enhancing performance, TRAZER aligns perfectly at the point where biology, technology, and data intersect to engage the brain + body and provide insights that are prescriptive, predictive, and preventative.
Watch a brief video to see TRAZER in action:
How does it work?
Simply put, TRAZER is Hardware + Software + Data Analytics.
The TRAZER system consists of a depth-sensing camera and a specialized hard drive that runs TRAZER's HIPAA-compliant software. TRAZER tracks 25 points on the body to process millions of data points in real-time. You’ll see it is easily connected to the TV for display. It can be installed on a wall or on a wheeled stand to be moved within your facility.
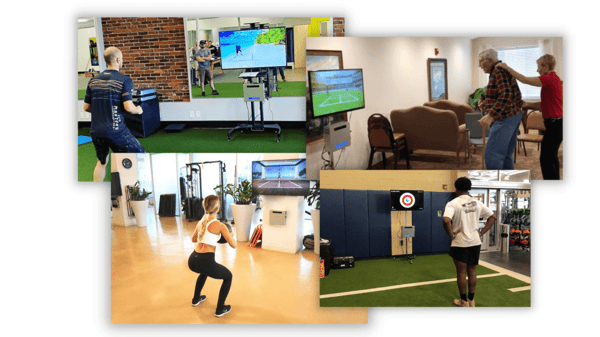
The TRAZER software includes more than 150 interactive activities built to assess different types of movement: Dynamic Movement, Kinematics, Neuromechanics, and Balance.
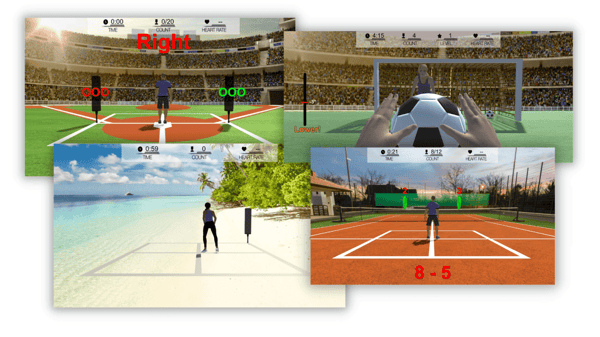
Once an activity is selected, a 3-second calibration will begin. During calibration, the camera is searching for 25 points on the User's body to lock onto in order to track their movement. Once calibrated, the User will appear on-screen as an avatar, reflecting their movements in the real-world. As the User moves and reacts to the cues on-screen, the software is recording and analyzing millions of data points.
Upon completion of the Activity, TRAZER generates a robust report of the User’s movement data.
Using the Equipment
The TRAZER+ Unit
- Requires connection to a power source and a TV (via HDMI) for display.
- Push the black button on the top of the unit to turn it on. It will take a moment for the system and application to load.
- When the application is ready, the Sleep Screen will show your Site Name. Click anywhere on the screen - using your TRAZER remote - to enter.
.png?width=350&height=350&name=equipment%20mockups%20(12).png)
The Remote
This remote will allow you to navigate your TV screen like a computer mouse. Your TV remote is separate, and cannot control the TRAZER application.
PRO TIP: Aim the remote at the TRAZER unit - not the TV.

- Click Ok to select/confirm
- The Cursor function is activated and deactivated by pressing the mouse arrow button located the the top left of the OK button.
- The scrolling function is activated if the Cursor function is turned off. Scroll by clicking the up, down, right, and left arrows around the OK button.
- You can scroll with the Cursor function activated by clicking and holding OK and dragging up or down.
- The keyboard on the back of the air mouse can be used while creating Users, in the search tab, or in the Admin Settings section.
Make sure to plug the charging cord into one of the USB slots on the side of the TRAZER+ unit to charge the remote.
Navigate the System
Introducing TRAZER
A critical aspect of your users' experience is understanding the value of their TRAZER sessions.
Throughout this section, we're going to use examples of a client/patient named Ray who has never used the system. Let's introduce him to TRAZER:
Welcome back, Ray. Today, we're going to work on your mobility with the TRAZER system. TRAZER has a camera that sees a lot more than I can, 25 points on your body to be exact... and will report back to us how well you move in this space. Now the fun part is, you get to play an interactive game - and I get insight into your movement to identify what areas we should focus on. The first thing we're going to do is create your profile so we can track, and actually visualize, your progress over time.
Creating a User
All of your Users need their own unique TRAZER profile to record all of their reports and compare their data over time.
When creating a User, you will need to fill out the required information on the User Profile. From there, you can enter Sport and Injury information, if applicable, or click Next to skip those sections. You can always update this information later from the unit or from your Portal (more on that to come).
Here's a brief video demonstrating creating a user profile on TRAZER+.
There is also an option to create a User via a QR code. You - or your User - can scan this code from the camera of a mobile device. You will be taken to a web page where you enter a unique code (shown on screen) and enter User profile information. Upon completion, the User record will exist in the system and be immediately available to select from the User Menu on the unit (when connected to WiFi).
You can also import Users in bulk to your TRAZER Portal. Click the link for instructions on importing: https://university.trazer.com/knowledge/how-to-bulk-import-users-in-the-portal
Once your User is created, you can search for their profile and select them from the list to log them in.
Starting an Activity
We recommend the first Activity you do with every new User is an Assessment. The Assessments category of activities are standardized and best for establishing the initial baseline of a User's performance. As the User performs this activity over time, you can benchmark their progress and compare sessions to monitor progression/degradation over time and chart changes.
The following video demonstrates how to navigate the system to select and start an Activity:
Back to our Ray example...
We're going to establish a baseline for Ray with one of our most popular Assessments: the Lateral Agility Screen-90. The LAS-90 is a 90-second test of a User's ability to see random stimuli and react by moving to the left or right. This test is a great starter activity for a new user to introduce the virtual environment and build the user's confidence in using TRAZER. It will give us insight into both Ray's reaction time - how long it takes him to process information and move as directed - as well as to any movement asymmetries - or difference between movement to the left and movement to the right.
Let's get started:
Ray, what I want to do is establish a baseline of your movement. We're going to look at how you move left and right, from side to side. Once you're in the activity, you'll see yourself on screen as an avatar.
As soon as you see a target pop up to the left or right of your avatar, I want you to move your body in that direction to guide your avatar to it on the screen.
Before I click Start, stand here right in the middle of our TRAZER area and face the TV. I'm going to step aside while the camera focuses on you.
Reviewing the report
Once an activity is complete, a report will load on screen. You will notice a difference between reports from activity to activity as the system will show a report relevant to the activity and metrics.
You will always be taken to an overview report, showing summarized information from the activity.
Back to our Ray example...
Let's look at Ray's Report:
.png?width=1000&height=563&name=Screenshot%20(145).png)
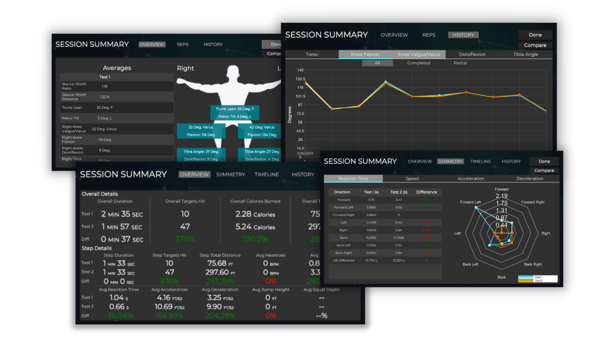
The overview report shows both Overall details and Step details as a high-level overview for the test and the step selected.
The Overall metrics include data from the start of the activity - including calibration - to the end of all of the steps in the activity. This specific activity is only 1 step. For multi-step activities, you can click the Choose Step drop-down to view metrics for each step.
Different types of activities will show different report sections. This activity is a Dynamic Movement activity so you will see a Symmetry Report. (We will learn about the different types of reports and dive in to metrics in TRAZER 201.)
.png?width=1000&height=563&name=Screenshot%20(147).png)
The Symmetry report has sub-tabs for each metric tracked: Reaction Time, Speed, Acceleration, and Deceleration.
On each tab, you will see an average of the reported metric listed by direction of movement. These metrics are also shown to the right plotted on a spider graph.
We can see Ray's reaction times for targets to the left and right. The average of time from the moment the target appeared until he initiated movement in that direction, was .76 seconds for targets to the left and .6 for targets to the right.
TRAZER identifies asymmetry between directions in a color code. The difference is displayed as a percentage and to which side.
- Under 10% = green, symmetrical
- Between 10-20% = yellow, asymmetry detected
- Above 20% = red, significant asymmetry detected
So the difference in Ray's reaction times to the left and right was in the red zone. He reacted 26.64% faster to the right.
You will want to check for asymmetry in all 4 tabs.
In the Timeline Report, we can see these metrics - as well as heart rate - charted at 10-second intervals through the course of the activity.
.png?width=1000&height=563&name=Screenshot%20(140).png)
The History report shows these metrics charted over time so we can visualize progression every time Ray does this activity.
What next?
Now that we've established Ray's baseline and identified asymmetries, we can create goals for him and come back to this activity to benchmark his progress.
The best way to utilize the system is to establish a baseline of your User's performance and then repeat these activities to benchmark progress.
Whether healthy or injured, a Baseline provides highly valuable information for both you (the Provider) and your Users. Once a Baseline is established, you can create customized goals with comprehensive data that allows you to track progress, and most importantly, gives you definitive charting in case of injury or post injury - making the intangible, tangible through data.
Every TRAZER Activity serves as a Benchmark, tracking progression or degradation. These benchmarks give you the unique ability to see the unseen, measure progress, and adjust your care plan or training regimen accordingly.
Our co-founder, Barry French, discusses Baselines + Benchmarks: