
.png?width=600&height=321&name=TRAZER%20Teachable%20Course%20Cover%20(1).png "TRAZER Teachable Course Cover (1)")
What is TRAZER?
Designed for injury recovery, injury prevention, and enhancing performance, TRAZER aligns perfectly at the point where biology, technology, and data intersect to track, measure, and improve physical and cognitive function regardless of age or capability.
A multi-purpose technology with wide-ranging applications spanning healthcare, senior care, sports, wellness, orthotics & prosthetics, and workplace injury prevention, TRAZER helps every body move better.
TRAZER is the only technology of its kind that strengthens the Brain + Body™ connection.
Combining immersive simulation and reaction-based challenges with motion-capture technology and advanced analytics, TRAZER identifies areas of weakness, tracking key metrics related to Balance, Dynamic Movement, Kinematics, and Neuromechanics. The TRAZER® System was created to deliver better outcomes for Users, Providers, and Organizations.
The multi-patented TRAZER system features a specialized computer with a high-powered depth-sensing camera that tracks 32 points on the body at 30 frames per second, proprietary algorithms and software to process millions of data points in real-time – without sensors or wearables – and a HIPAA-compliant portal for data security and advanced analytics.
Watch a brief video to see TRAZER XP in action:
How does it work?
Simply put, TRAZER is Hardware + Software + Data Analytics.
TRAZER XP hardware (unit) consists of a depth-sensing camera and a specialized hard drive that runs the cloud-based TRAZER application.
TRAZER uses the camera to track 32 points on the body and proprietary algorithms to process millions of data points in real-time. The unit connects to a TV for display and can be installed on a wall or on a wheeled stand to be moved within your facility.

The TRAZER XP Activity Library includes more than 150 interactive Activities built to assess different types of movement: Dynamic Movement, Kinematics, Neuromechanics, and Balance.
.png?width=1400&height=788&name=Layered%20Graphics%20for%20Website%20(3).png)
Once an Activity is selected, a 3-second calibration will begin. During calibration, the camera is searching for 32 points on the User's body to lock onto in order to track their movement. As the User moves and reacts to the cues on-screen, the software is recording and analyzing millions of data points.
Upon completion of the Activity, TRAZER generates a robust report of the User’s movement data.
.png?width=1400&height=788&name=Layered%20Graphics%20for%20Website%20(5).png)
Tips for Producing Accurate Data
TRAZER XP uses a motion capture camera to track points on the body. It's important to consider the following conditions to ensure the camera can "see" the points on the body for accurate data and optimal avatar appearance.
- Clothing: Ensure that the clothing worn by the User is non-reflective and not loose or baggy for appropriate joint tracking. For example, pants that are too long with wide bottoms may interfere with tracking the ankles. Additionally, avoid clothing with vibrant patterns or glossy textures as they can cause reflections and affect tracking.
- Lighting: Proper lighting is crucial for capturing accurate motion data. Avoid excessive direct light sources such as windows or spotlights that can cause reflections or uneven lighting. Consistent lighting conditions throughout the space are essential to maintain data accuracy.
- Calibration: Ensure the User is standing upright during calibration and that areas of the body can be discerned. If the User is calibrated in a lower/leaned stance, the avatar may appear to be floating above the ground. For Users in wheelchairs or seated positions, ensure ankles can be discerned and arms are visible.
- Space: Keep the Active Sensing Area (shown below) clear of obstacles that could hinder movement or block line-of-sight for the camera. Maintain sufficient distance from walls or equipment to prevent accidental collisions or interference during Activities.

For outdoor use, please read this article: https://university.trazer.com/knowledge/how-to-use-trazer-xp-outdoors
Using the Equipment
The TRAZER XP Unit
- Requires connection to a power source and a TV (via HDMI) for display.
- Requires internet connection.
- Push the black button right-hand side on the far back to turn it on. It will take a moment for the system and application to load.
- When the application is ready, the Sleep Screen will show your Site Name. Click anywhere on the screen - using your TRAZER remote - to enter.
.png?width=600&height=600&name=equipment%20mockups%20(13).png)
The Remote
This remote will allow you to navigate your TV screen like a computer mouse. Your TV remote is separate, and cannot control the TRAZER application.
PRO TIP: Aim the remote at the TRAZER unit - not the TV.
.png?width=600&height=600&name=equipment%20mockups%20(15).png)
- Click Ok to select/confirm
- The Cursor function is activated and deactivated by pressing the mouse arrow button located the the top left of the OK button.
- The scrolling function is activated if the Cursor function is turned off. Scroll by clicking the up, down, right, and left arrows around the OK button.
- You can scroll with the Cursor function activated by clicking and holding OK and dragging up or down.
- The keyboard on the back of the air mouse can be used while creating Users, in the search tab, or in the Admin Settings section.
Make sure to plug the charging cord into one of the USB slots on the side of the TRAZER XP unit to charge the remote.
The KEYBOARD
The keyboard connects to your TRAZER XP unit with a USB plug for navigation. The keyboard allows easy entry of User Profile information, Activity searches, and Admin Settings.
.png?width=600&height=600&name=equipment%20mockups%20(20).png)
The keyboard is battery powered so make sure to turn the keyboard off when not in use.
Navigate the System
Logging In
You will need a TRAZER Admin account to login to the application (and the Portal).
If you do not have one, please contact your Super Admin or Site Admin to create your account.
The TRAZER application is intended to be used online, connected to the internet. To access the application, enter your username or email along with your password.
To use TRAZER without an internet connection, in case of sudden connection loss or to use where internet is unavailable, the application can be put into Offline Mode for up to 72 hours at a time. When the application detects loss of internet, a pop-up will appear prompting you to either try to re-establish the connection, or to enter Offline Mode. To login in Offline Mode, you must have already logged in with your credentials in Online Mode. You will log in with your username and the 4-digit PIN that was established while creating your password and verifying your email.
When attempting to login, please pay attention to the title of the login menu.
- If the title says "Login", this means the unit is online and you should use your username or email with your password to access.
- If the title says "Offline Mode", this means the unit is offline and you should use your username and PIN to access.

Introducing TRAZER
A critical aspect of your Users' experience is understanding the value of their TRAZER sessions.
Throughout this section, we're going to use examples of a client/patient named Ray who has never used the system. Let's introduce him to TRAZER:
Welcome back, Ray. Today, we're going to work on your mobility with the TRAZER system. TRAZER has a camera that sees a lot more than I can, 32 points on your body to be exact... and will report back to us how well you move in this space. Now the fun part is, you get to play an interactive game - and I get insight into your movement to identify what areas we should focus on. The first thing we're going to do is create your profile so we can track, and actually visualize, your progress over time.
Creating a User
To effectively track and compare data over time, each User must have their own unique "User" profile. Before starting a session with a User, you will be prompted to select their profile from the Select User menu. If the User does not have a profile yet, it can be easily created.
When creating a User, it is important to provide the necessary information on the User Profile. You can also enter sport and injury information if applicable, or skip it by clicking Create User. This information can always be updated later from the Unit or the Portal.
Watch this brief video to see how to create a User Profile on TRAZER XP.
The User Profile information is used in reporting metrics and also affects the appearance of the User's avatar.
Email, Phone, Medical Record Number, and Dominance are optional fields.
You can add an additional level of security for a User by setting a User Access PIN. If you enter a 4-digit PIN during creation, it will be required to access the User Profile.
Sport and Injury information are optional but can be used to generate analytics in the Portal.
Users can also be created using a QR code. Simply scan the code with your mobile device's camera, enter the unique code shown on-screen, and provide User Profile information. Once completed, the User record will be immediately available to select from the Select User menu on the Unit.
If you have a large number of Users, you can import them in bulk to your TRAZER Portal.
Learn how to do this here.
After creating a User, you will be prompted to log them in.
Remember to log Users out when they are finished using TRAZER to avoid accidental use of the wrong User Profile. Simply click the icon in the top-right corner and select Switch User.
New User Orientation
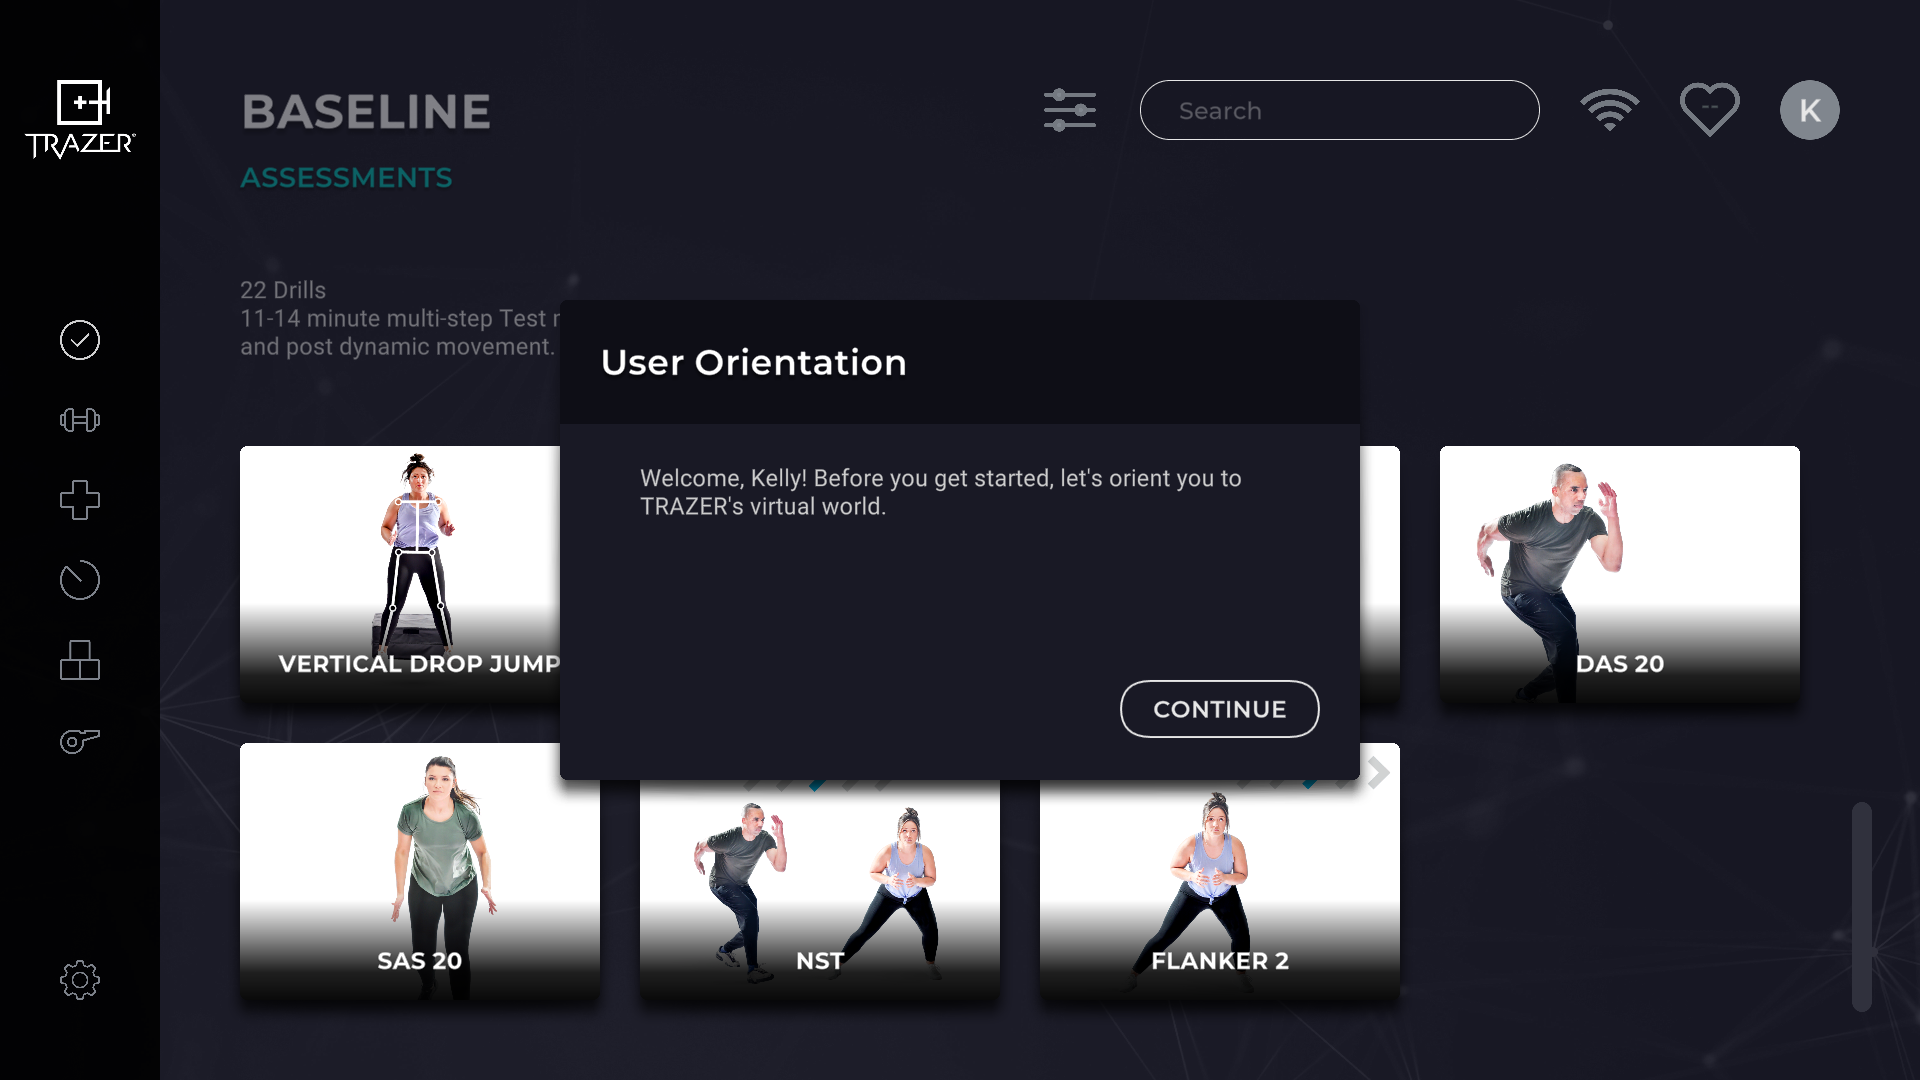
Back to our Ray example...
Let's get started:
Ray, we're going to start with a quick practice session so you can learn how TRAZER works. Once you're in the Activity, you'll see yourself on screen, in the simulation, as an avatar.
As soon as you see a target pop up to the left or right of your avatar, I want you to move your body in that direction to guide your avatar to it on the screen.
Before I click Start, stand here right in the middle of our TRAZER field and face the TV. I'm going to step aside while the camera focuses on you.
You do not need to complete this Activity, the purpose is to ensure your User understands how to move themselves following on-screen cues. Once they are comfortable with the simulation experience, you can move on to an Activity of your choice.
Choosing an Activity
Before selecting an Activity for the User, it's important to understand the different types of Activities available in the Activity Library.
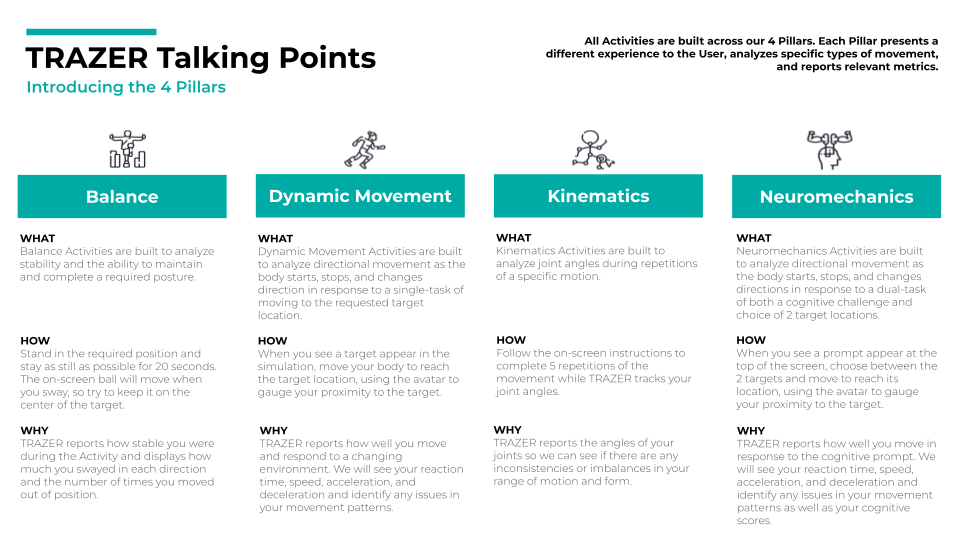
All Activities are built across our 4 Pillars. Each Pillar presents a different experience to the User, analyzes specific types of movement, and reports relevant metrics.
Here are some snippets and high-level differences between the Pillars to help you select an Activity and appropriately explain what the User can expect:
Click the image to download.
In TRAZER XP 201 Onboarding, you will learn all about TRAZER's 4 Pillars and the metrics reported for each.
Starting an Activity
We recommend the first Activity you do with every new User is an Assessment. The Assessments category of Activities are standardized and best for establishing the initial baseline of a User's performance. Repeat this Activity with your User over time to benchmark their progress and compare sessions to monitor progression/degradation and chart changes.
Watch the following video to learn how to start and administer an Activity:
We're going to establish a baseline for Ray with an Assessment: Isolated Directional Agility (formerly named Vector Test). This is a 5-step test of a User's movement in different patterns and directions of movement. This is a Dynamic Movement Activity and will require the User to move and "hit" a target before the next is presented. It will give us insight into both Ray's reaction time - how long it takes him to process information and move as directed - as well as to any movement asymmetries - or differences between movements in certain directions.
Ray, now that you have been oriented to TRAZER, I want to establish a baseline of your movement. We're going to look at how you move in different patterns.
Let's review the instructions for the first step.
Ensure the User understands the instructions before each step of the Activity and direct them as needed during the Activity.
Reviewing the Report
Once an Activity is complete, a report will load on-screen. Report sections and data will vary based on the type of Activity. (You will learn more about types of Activities and their Reports in 201 Training.)
The following video explores the structure of reports:
Back to our Ray example...
Let's look at Ray's Report.
The Overview Report for a multi-step Activity provides a summary of all steps.

Overview metrics include data from the start of the Activity - including calibration - to the end of all of the steps in the Activity.
The Steps are listed on the left. Select one from the list to review its Report.
Different types of activities will show different Report sections. This example is a Dynamic Movement activity so you will see a Symmetry Report. (We will learn about the different types of reports and dive in to metrics in TRAZER XP 201.)


The Symmetry Report has subsections to segment tracked metrics: Reaction Time, Dynamic Reaction Time, Speed, Acceleration, and Deceleration. Some Activities do not track all 5 of these metrics.
Each metric is represented by a clickable card on the left side of the Symmetry tab. After clicking a metric card, you will see an average of the reported metric listed by movement directions in the Activity on the List tab. These metrics are also plotted on a spider graph on the Graph tab to visualize the differences.

We can see Ray's average reaction times for all directions in this Step. Reaction Time is tracked for each random target, from the moment it appears on screen to the time the User initiates movement. Ray's Reaction Time to the left was 1.34 (rounded down to 1.3) seconds and 1.28 (rounded up to 1.3) seconds to the right.
TRAZER identifies symmetrical differences between directions as a percentage and labels to which side the deficit is. The difference is displayed in the following color code.
- Under 10% = green, symmetrical
- Between 10-20% = yellow, moderate asymmetry detected
- Above 20% = red, significant asymmetry detected
So the difference in Ray's reaction times to the left and right was in the green zone: 5% L. He reacted 5% slower to the left. The left direction is the deficiency since a lower Reaction Time is considered better.
You will want to check for asymmetry in all 5 tabs.
In the Timeline Report, we can see these metrics - as well as heart rate - charted at 0.5-second or 10-second intervals through the course of the activity.

Each metric is represented by a clickable card on the top side of the Timeline tab. After clicking a metric card, you will see the data points plotted on a line graph to visualize the changes in the metric at each 0.5-second or 10-second interval. Below the graph you will see the following data to help summarize the graph above:
- Start - an average of the first interval
- Min - the lowest recorded data point interval
- Max - the highest recorded data point interval
- Average - the average of all recorded data intervals
- End - an average of the last interval
Keep in mind that these pieces of data will change based on the selected interval in the bottom-right hand corner of the Timeline tab.
The Progress report shows these metrics charted over time so we can visualize progression every time Ray does this activity.

Each metric is represented by a clickable card on the left side of the Progress tab. After clicking a metric card, you will see the progression or degradation based on the first and last test listed in the List tab table.
It's important to review the Reports for all Steps in the Activity.
What next?
Now that we've established Ray's baseline and identified asymmetries, we can create goals for him and come back to this activity to benchmark his progress. Keep in mind - in this example we used a Vector Test Assessment - you can utilize any TRAZER Activity, or multiple Activities, to establish a Baseline.
The best way to utilize the system is to establish a baseline of your User's performance and then repeat this Assessment to benchmark progress.
Whether healthy or injured, a Baseline provides highly valuable information for both you (the Provider) and your Users. Once a Baseline is established, you can create customized goals with comprehensive data that allows you to track progress, and most importantly, gives you definitive charting in case of injury or post injury - making the intangible, tangible through data.
To easily remember which Activity you used as a Baseline, you can use the Favorites function to save Activities specifically for the logged in User.

Click the star icon to save an Activity as a Favorite.

When the User is logged in, favorited Activities will be pinned to the top of the Activity Library menu so you can easily find your User's baseline Activity or other favorite Activities.
Every repetition of an Activity serves as a Benchmark, tracking progression or degradation over time. These benchmarks give you the unique ability to see the unseen, measure progress, and adjust your care plan or training regimen accordingly.
We will deep-dive into the different types of Activities in TRAZER XP 201.